
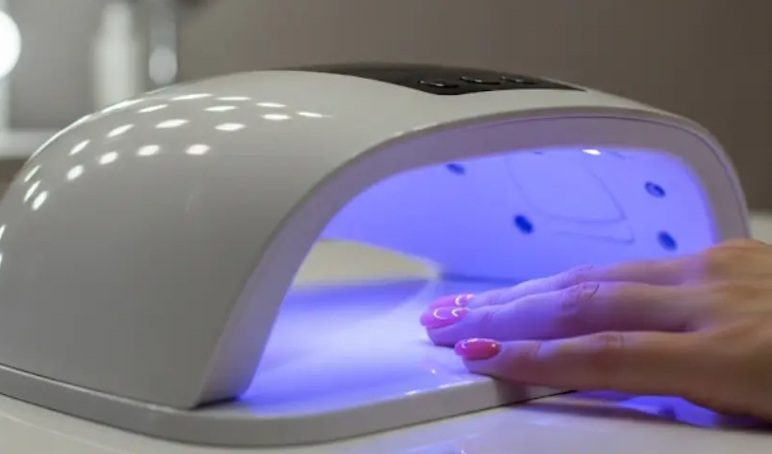
Achieving a salon-quality manicure at home has become more accessible than ever, largely thanks to the technology of the UV light for nails. If you love the durable, glossy finish of gel nails, you understand that the secret to their longevity is the curing process. This is where a good nail lamp comes in, using ultraviolet (UV) or light-emitting diode (LED) technology to harden and set your gel polish. This guide will walk you through everything you need to know about using a UV light for nails to get that perfect manicure right from the comfort of your own home.
Whether you’re a seasoned DIY nail enthusiast or a beginner looking to explore the world of gel manicures, this guide will provide the insights you need. We’ll cover the differences between UV and LED lamps, what features to look for, safety precautions, and how to properly use your lamp for a flawless finish every time.
Understanding the Technology: UV vs. LED Nail Lamps
When you start shopping for a nail lamp, you’ll quickly notice two main types: UV and LED. Both are designed to cure gel polish, but they do so in slightly different ways. Understanding these differences is key to choosing the right UV light for nails for your needs.
How Does a UV Nail Lamp Work?
A traditional UV nail lamp uses fluorescent bulbs that emit a broad spectrum of ultraviolet wavelengths. These wavelengths activate photoinitiators in the gel polish, causing the gel to harden, or “cure.” This process is known as polymerization. Because they emit a wider range of wavelengths, traditional UV lamps can cure almost any brand of gel polish.
However, they have some downsides. The curing process is generally slower, often taking around 2 minutes per coat. The bulbs also have a limited lifespan and will need to be replaced periodically, typically after about 100 hours of use, to maintain their effectiveness.
The Rise of the LED Nail Lamp
LED nail lamps are the more modern option. Instead of fluorescent bulbs, they use small, energy-efficient light-emitting diodes. These LEDs are engineered to emit a narrower, more targeted band of UV wavelengths. This focused energy allows them to cure compatible gel polish much faster, usually in just 30 to 60 seconds.
LED bulbs last significantly longer than UV bulbs, often for the entire life of the lamp (up to 50,000 hours), so you won’t need to worry about replacements. The main consideration is that some older or specific gel formulas may not be compatible with the narrower wavelength of an LED lamp.
The Best of Both Worlds: Hybrid UV/LED Lamps
To solve the compatibility issue, many manufacturers now offer hybrid lamps. These advanced models are equipped with dual light beads that combine both UV and LED technology. A UV/LED lamp provides the speed and longevity of LED with the broad curing capability of UV. This makes it a versatile and popular choice, as it can cure virtually any type of gel, including base coat, top coat, builder gels, and polygels. For anyone serious about doing their nails at home, a hybrid UV light for nails is often the best investment.
Key Features to Look for in a UV Light for Nails
With so many options on the market, choosing the perfect UV light for nails can feel overwhelming. To simplify your decision, focus on these key features that contribute to performance, convenience, and safety.
Power and Wattage
Wattage is one of the most important factors, as it directly impacts curing speed. A higher wattage generally means a faster, more efficient cure.
- Low Wattage (Under 24W): These are often found in mini or portable lamps. While affordable, they take longer to cure and may struggle with thicker or more pigmented gels.
- Medium Wattage (24W-48W): This is a great range for home use. A 48W lamp offers a good balance of speed and power, efficiently curing most gel polishes.
- High Wattage (72W and up): Lamps with high power, such as 168W, 220W, or even 320W, are considered professional grade. They offer the fastest curing times and can handle all types of gels, making them ideal for nail technicians or anyone who wants salon-level results. A fast curing lamp saves you significant time during your manicure process.
Timer Settings and Automatic Sensors
Customizable timer settings add a layer of precision and convenience to your manicure.
- Multiple Timers: Look for lamps with at least three preset timers, such as 10s, 30s, and 60s. This allows you to select the appropriate curing time based on the gel polish manufacturer’s recommendations.
- Low Heat Mode: Many modern lamps feature a 99s low heat mode. This setting starts with low power and gradually increases, which helps prevent the uncomfortable “heat spike” sensation that can occur with thicker gels or on sensitive nail beds. This painless curing mode makes the experience more enjoyable.
- Infrared Automatic Sensor: An automatic sensor is a must-have feature for ease of use. It automatically turns the lamp on when you insert your hand or foot and off when you remove it. This hands-free operation prevents smudging your freshly applied polish.
- LCD Display: A large LCD display clearly shows the countdown, so you always know how much curing time is left.
Design and Portability
The physical design of the lamp affects its usability and convenience.
- Size and Space: Ensure the lamp has a spacious interior. A well-designed lamp should be large enough to comfortably fit all five fingernails or toenails at once without the risk of bumping the sides.
- Removable Tray: A removable tray or base is highly practical. It makes cleaning the lamp easier and simplifies the process of doing pedicures.
- Portable Handle: A portable handle is a useful feature for moving the lamp around or storing it. If you need a lamp for travel or for doing nails on the go, consider a cordless or rechargeable model. Mini lamps are also great for quick fixes and travel.
How to Safely Use a UV Light for Nails
While using a UV light for nails is generally safe, it’s important to follow best practices to protect your skin. The light emitted is a form of ultraviolet radiation, and repeated exposure should be managed carefully.
Protecting Your Skin
- Use UV-Protective Gloves: These are fingerless gloves that cover the skin on your hands, leaving only your nails exposed. They are an excellent way to shield your skin from direct exposure.
- Apply Broad-Spectrum Sunscreen: About 20 minutes before your manicure, apply a broad-spectrum sunscreen with an SPF of 30 or higher to your hands. This will help protect your skin from UV radiation.
- Follow Curing Times: Do not over-cure your nails. Stick to the manufacturer’s recommended times for your specific gel polish and lamp. Curing for longer than necessary provides no benefit and only increases your exposure.
Lamp and Polish Compatibility
- Read the Instructions: Always follow the instructions for both your UV light for nails and your gel polish. The polish manufacturer will specify the recommended curing time and the type of lamp (UV, LED, or both) needed.
- Avoid Regular Polish: A UV light for nails is designed specifically for gel polish. It will not dry regular nail polish, which dries through air evaporation. Using a lamp on regular polish is ineffective.
A Step-by-Step Guide to a Perfect Gel Manicure at Home
Ready to put your UV light for nails to use? Follow these steps for a long-lasting, professional-looking gel manicure.
Step 1: Prep Your Nails
Proper prep is the foundation of a durable manicure. Start by shaping your nails with a file. Gently push back your cuticles and trim any excess. Lightly buff the surface of your nails to remove shine, which helps the gel adhere better. Finally, wipe your nails with an alcohol or cleanser wipe to remove any dust and oils.
Step 2: Apply the Base Coat
Apply a thin, even layer of base coat to each nail. Be careful to avoid getting any polish on your skin or cuticles. This can cause lifting later on.
Step 3: Cure the Base Coat
Place your hand in the UV light for nails and cure for the recommended time (typically 30-60 seconds). Your nails will feel slightly sticky after curing; this is normal and helps the color coat adhere.
Step 4: Apply the Color Polish
Apply a thin coat of your chosen gel polish color. Thin coats are crucial for proper curing. If you apply the polish too thickly, it may not cure all the way through, leading to bubbling or peeling.
Step 5: Cure the Color Polish
Cure the color coat under your nail lamp. Depending on the lamp’s wattage and the polish’s formula, this will usually take 30-60 seconds. Repeat steps 4 and 5 for a second coat to achieve a rich, opaque color. Darker colors may require slightly longer curing times.
Step 6: Apply the Top Coat
Apply a thin layer of top coat to seal in the color and add a high-gloss shine. Make sure to “cap” the free edge of your nail by running the brush along the tip. This helps prevent chips.
Step 7: Final Cure
Perform a final cure under the UV light for nails for 60-90 seconds to ensure the top coat is fully hardened.
Step 8: Remove the Tacky Layer
After the final cure, your nails will have a sticky inhibition layer. Use a lint-free wipe soaked in isopropyl alcohol to gently wipe each nail. This will reveal the smooth, glossy, and completely dry finish.
Troubleshooting Common Issues
| Issue | Cause | Solution |
| Bubbling/Wrinkling | Polish was applied too thickly or not cured long enough. | Apply thinner coats and ensure you are curing for the recommended time. |
| Peeling/Lifting | Improper nail prep or polish on the skin/cuticles. | Make sure to properly prep the nail surface and avoid contact with the skin. |
| Sticky Finish | Normal inhibition layer or under-cured polish. | Wipe with alcohol after the final cure. If still sticky, cure for an additional 30 seconds. |
| Heat Spike | A chemical reaction as the gel hardens quickly. | Use your lamp’s painless curing mode or remove your hand for a few seconds if it feels too hot. |
Choosing the Right UV Light for Your Needs
The best UV light for nails for you depends on your budget, how often you plan to do your nails, and your desired features.
- For Beginners: A 36W or 48W UV/LED lamp with an automatic sensor and basic timer settings is a great starting point. It’s affordable, effective, and easy to use.
- For Enthusiasts: If you do your nails frequently or enjoy complex nail art, consider a rechargeable lamp with higher wattage (72W or more), a low heat mode, and a removable base. This will provide more flexibility and speed.
- For Professionals: A high power UV/LED lamp with a durable build, long-lasting bulbs, and advanced features is essential for salon use. Look for brands known for reliability and performance.
Investing in a quality UV light for nails transforms your at-home manicure game, allowing you to achieve beautiful, long-lasting gel nails whenever you want.
Frequently Asked Questions (FAQs)
1. Can a UV light for nails damage your skin?
Prolonged or frequent exposure to UV radiation can pose risks to the skin. To minimize this, you can wear UV-protective gloves or apply broad-spectrum sunscreen to your hands before using a UV light for nails. Additionally, always follow the recommended curing times to limit exposure.
2. What is the difference between a UV and an LED nail lamp?
A traditional UV lamp uses fluorescent bulbs with a broad UV spectrum and takes longer to cure (about 2 minutes). An LED lamp uses diodes with a narrower spectrum, curing polish much faster (30-60 seconds) and lasting longer. A hybrid UV/LED lamp combines both technologies for maximum speed and compatibility.
3. How do I know what wattage I need for my nail lamp?
For casual home use, a 24W-48W lamp is sufficient. For faster curing and more versatility with different types of gels (like builder gels), a higher wattage lamp of 72W or more is recommended. Professional nail technicians often use lamps with high power (150W+) for maximum efficiency.
4. Why is my gel polish still sticky after curing?
A sticky layer, known as the inhibition layer, is normal after curing each coat of gel polish. This layer helps the next coat adhere. After applying and curing the final top coat, you simply wipe this layer off with a lint-free pad soaked in isopropyl alcohol to reveal the hard, glossy finish. If it’s still soft underneath, the polish may be under-cured.
5. Can I use a UV light for nails to dry regular nail polish?
No, a UV light for nails cannot dry regular nail polish. Gel polish contains photoinitiators that react to UV/LED light to harden. Regular nail polish is solvent-based and dries through the process of evaporation, which requires exposure to air.
